Excel in Access (Part 2)

Excel in Access (Part 2)

A Common Misconception for Excel Users Transitioning to MS Access 🚫
One of the biggest mistakes people make when they move from Excel to MS Access is that they assume MS Access is just a more powerful version of Excel, and their Excel tables will work as-is in MS Access. The problem is…they do work! This mistake leads to a variety of problems which, if not nipped in the bud, cause a massive headache for the would-be MS Access Developer very quickly. 😖

Introducing: The Nifty Access Normalization Tool 🛠️
Using the ‘Nifty Access Normalization Tool’, we converted a spreadsheet-type table into the beginnings of a relational set of tables. From Table 1a, we derived a look-up table, Table 1b. This process results in a total of three tables:

  • tblStudent: Contains the student names, and is what remains of the first table. 👥
  • tblStudentSubject: Stores the subjects related to each student. 📚
  • tblSubject: Serves as a look-up table to store the actual subject descriptions. 📖

In Excel in Access (Part 1) we went from "Table 1a"

This Table “Table 1a” serves as an example of an un-normalised table. I will use it as the basis of the process of converting the “UN-NORMALISED” into several tables, which is the approach required to NORMALISE MS Access tables.

Table 1a

An example of a Non-Normalised table in MS Access

In Excel in Access (Part 1) we went to " Table 1b"

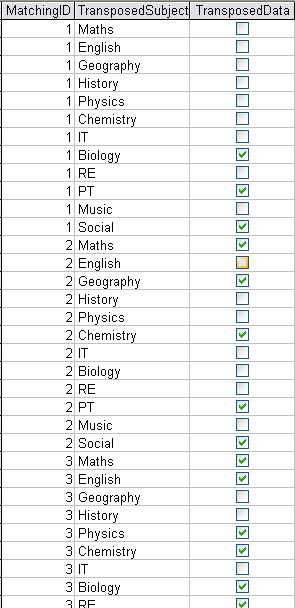
The Nifty Access Normalisation Tool turns the preceding table “Table 1a” into several tables one of them this one:- “Table 1b” As you can see “Table 1b” contains all of the information from the the unnormalized table “Table 1a” but in a normalised format. However, it does need some extra helper tables……

Table 1b

The Nifty Access transposition tool turns the preceding table into several tables one of them this one.

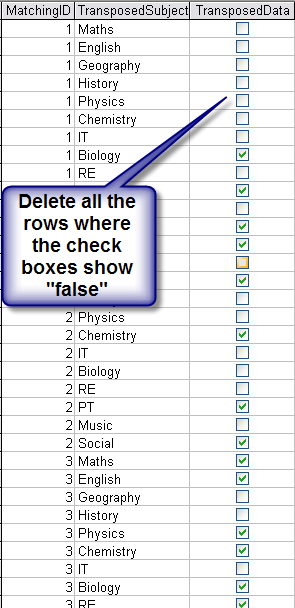
The "Unselected" Check Boxes can be removed

However you may be looking at the new resultant table “Table 1b” and wondering what on earth to do with it. I hope to take you through the process of making it into something useful in this thread. The first thing you will notice is that where the check box is not checked, then that whole row is redundant, for instance there’s no need to record that ID number “1” — “Has Not” taken Maths, English, Geography, Physics etc, it would suffice just to record the subjects that have been taken , In this case Biology, PT and Social. Looking at those entries in particular, then a general rule of logic can be defined, “delete all the rows where the check boxes are false”.

Use a query to select just the records where the checkbox is false and then you can delete them

The "Unselected" Check Boxes can be removed

Remove the unchecked Check Boxes

Form based on Students List

It becomes obvious that the Check Boxes themselves which now “All” contain a “True Value” are also redundant, they can be deleted, just leaving you the text entry identifying the subject taken by each student. Now the table only shows checked items so the Check Box itself is superfluous and we can delete of that Column… To be clear, you delete the checkbox column, not the “checked rows”

Form based on Students List

The Check Mark is superfluous. Delete that Column.

create a look up table

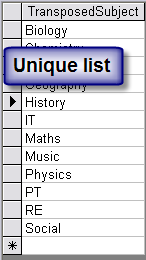
Using the “relational” properties of the database there is one more thing you can do which will improve efficiency and that is to replace each text entry — Maths, English, Geography, Physics etc, with a number linking that field to a look up table. First of all you need to create a look up table; this can be done by applying a create table query to extract just the unique values for the “subject”.

create a look up table

Use a "Create Table Query" to extract just the unique values...

This "unique list" called "tblSubject" (a lookup table)

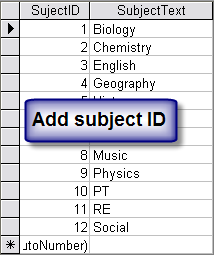
This unique list should be called “tblSubject” this table is not quite finished, you need to add an identity column to the left of the text representing the individual subject, this identity will then appear in the previous table. .

This "unique list" called "tblSubject" (a lookup table)

Unique list should be called "tblSubject"

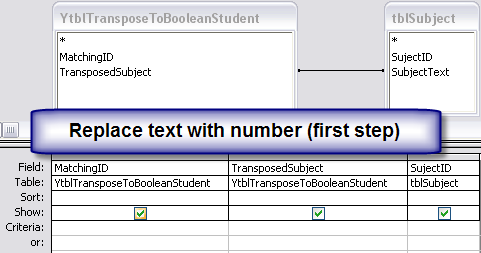
Replace the entries in the student subject table "tblStudentSubject" with the ID

Once you have completed the “Lookup Table” you then need to replace the entries in the student subject table “tblStudentSubject” where it shows subject in text form with the number representing the link to the look up table. This is the query:

Replace the entries in the student subject table "tblStudentSubject" with the ID

Replace the entries in the student subject table "tblStudentSubject" with the ID

These changes to the table make it efficient

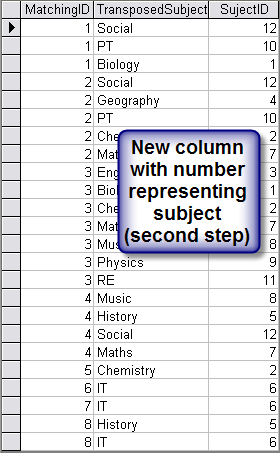
Adding this new subject ID as opposed to leaving the “Subject Text” in place can make your database much more efficient, especially if you have hundreds of thousands of Records. This way your design changes to the table are making it much more efficient, holding the same information but with less data.

These changes to the table make it efficient

Here is the new column

you never know how big your dB is going to get. Get it right, right from the beginning.

This is particularly important if the text, instead of being just a couple of words, let’s say it was several 100 characters, and if you had thousands of Records, then this would add a considerable bloat to your database unnecessarily. Even if you have a small database, it’s well worth doing, you never know how big your dB is going to get. Get it right, right from the beginning. It doesn’t take much effort once you understand how to do it.

you never know how big your dB is going to get. Get it right, right from the beginning.

Text removed just leaving the numbers

Open the Subform Property Sheet

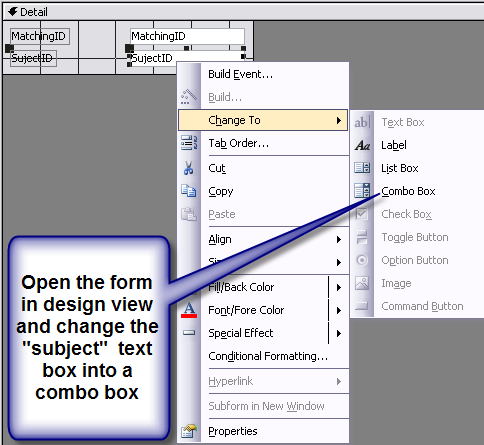
Next use the form wizard to create a simple form based on the student subject table “tblStudentSubject” the form should show two text boxes one for each of the columns in the table, “MatchingID” & “SubjectID” Open the form in design view and change the subject text box to a combo box.

Open the Subform Property Sheet

Use the "Form Wizard" to create a simple form based on the student subject table & modify it as Shown:-

set its default view to "Datasheet View"

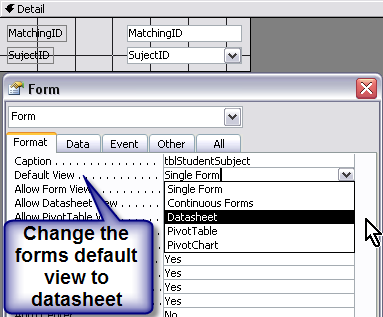
This form is going to be displayed as a subform on your main form in datasheet view. You need to go into the form properties and set its default view to “Datasheet View”

set its default view to "Datasheet View"

Set its default view to "Datasheet View"

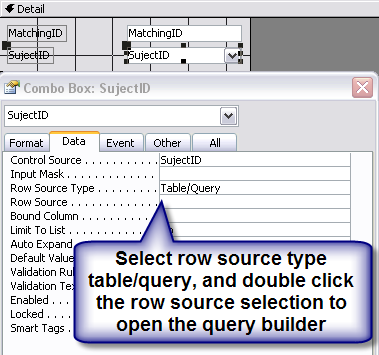
Open the query builder

While in design view select the combo box and access the combo box properties press the Ellipsis (…) in the “row source” property box to access the query builder.

Open the query builder

Press the Ellipsis (…) in the "row source" property

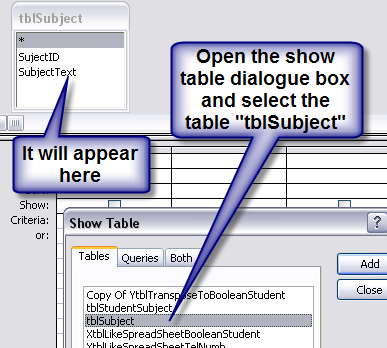
In the query builder select the table "tblSubject"

In the query builder select the table “tblSubject”

In the query builder select the table "tblSubject"

Select the table "tblSubject"

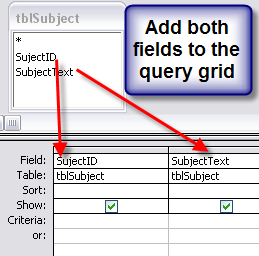
Drag both fields into the query builder grid

Then drag both fields into the query builder grid

Drag both fields into the query builder grid

Drag both fields into the query builder grid

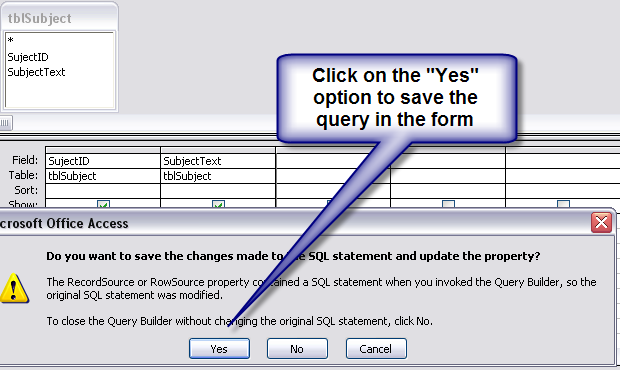
Click on yes to save these options

Click on yes to save these options

Click on yes to save these options

Click on yes to save these options

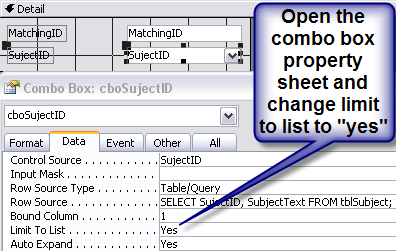
Set the combo box limit to list property to "Yes"

Click on yes to save these options

Set the combo box limit to list property to "Yes"

Set the combo box limit to list property to "Yes"

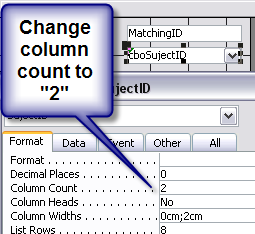
Still in the combo box properties, set the column count to "2"

Still in the combo box properties, set the column count to “2”

Still in the combo box properties, set the column count to "2"

Still in the combo box properties, set the column count to "2"

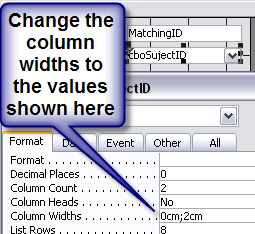
Still in the combo box properties, set the column widths as shown.

Still in the combo box properties, Set the column widths as shown.

Still in the combo box properties, set the column widths as shown.

and the column widths as shown.

Still in the combo box properties, Change the name of the combo box as shown or to your own particular naming convention.

Still in the combo box properties, Change the name of the combo box as shown, or to your own particular naming convention.

Still in the combo box properties, Change the name of the combo box as shown or to your own particular naming convention.

Change the name of the combo box as shown or to your own particular naming convention.

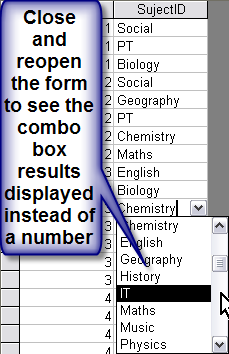
Close the form and reopen it; it should display in "datasheet view" and the numbers should be replaced by the text entries provided by the look up table.

Now close the form and reopen it; it should display in “datasheet view” and the numbers should be replaced by the text entries provided by the look up table.

Close the form and reopen it; it should display in "datasheet view" and the numbers should be replaced by the text entries provided by the look up table.

Close the form and reopen it.

In the original table; you can see it contains the now redundant check box fields

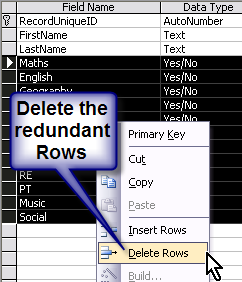
Open the table in design view and remove these redundant check box fields Please note: These “rows” actually represent the fields in the “Tables property window”, they control the display of the fields in the table.  On a re-reading this article just now I realised there was a source of confusion.  I am not suggesting you delete any rows in the table I am actually explaining how to delete “fields” from the table using the term “rows” could be very confusing!  
In the original table; you can see it contains the now redundant check box fields

Delete the redundant rows

Delete the redundant rows

Delete the redundant rows

Delete the redundant rows

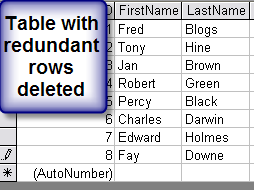
Table with redundant rows deleted

The original Table should now looks something like this:

Table with redundant rows deleted

Table with redundant rows deleted

More Useful Stuff HERE:-

This website uses third-party software - WordPress Add-Ins to be exact. I don't know what any individual add-in does, but I'm sure that many of them collect information about you. So be aware, if you continue using this site, then you are likely to be sharing your information. I don't know how to disable this sharing for any, or all of the plugins for individual users. So I can't stop the sharing of information. If this worries you then please do not use this site... If you continue to use this site I will assume that you are happy with it.

Do you need a hand in the right direction?

You are in the right place.